
Windows 11 automatically remembers all Wi-Fi networks that you have connected to. Windows can automatically connect to the network when it is within range. You can remove the network entirely from your computer if you don’t wish that to happen.
You may need to remove Wi-Fi networks you have been connected to, but not again. We will demonstrate four ways to delete a Wi-Fi network saved in Windows 11.
Removing old Wi-Fi networks is a great way to get the most out of Windows 11.
Although having many saved Wi-Fi network connections is not necessarily a problem, you may need to delete certain networks from your computer at times.
If you have previously connected your computer to a public network, but no longer intend to use it, it is best to delete the network. Perhaps you don’t want your computer to automatically connect to certain networks when they are available. It’s also possible to forget about a network and join it again to resolve minor connectivity issues.
Your computer can build up a list of Wi-Fi networks over time that it will not connect to. It is a good idea to delete old, unneeded Wi-Fi networks.
1. Use the quick settings panel to delete a Wi-Fi network you have already saved
You can access some of the most commonly used settings from Windows’ Quick Settings panel. It makes it simple to delete a Wi-Fi network that you have saved from Windows 11.
To open the Quick Settings panel, press Win + a. The arrow next to the Wi-Fi button is where you should click. A list of Wi-Fi networks will appear, including the one that you are currently connected. Right-click on the network that you wish to delete and choose To forget.
Would you like to make Windows more user-friendly? Learn how to customize Quick Settings on Windows 11.
2. You can delete a Wi-Fi network you have saved using the Settings app
The Quick Settings panel won’t show the Wi-Fi network that you wish to delete if it isn’t near. To remove it, use the Windows 11 Settings app.
You can forget to connect to Wi-Fi networks using the Settings app
- To open the Settings app, press win+me
- Navigate to network, internet tab, and click Wi-Fi.
- Click on Manage existing networks.
- To remove the Forget icon, click on it.
That’s all. Clicking on the Forget Windows button will remove the network profile associated to that network.
3. Use PowerShell or Command Prompt to delete a Wi-Fi network you have saved
A command line tool such as Command Prompt and Windows PowerShell can also be used to delete a Wi-Fi network that has been saved. A few commands in the terminal window can make it easy to forget about a WiFi network. This is how it works.
- To open the search menu, click the magnifying glass icon in the taskbar.
- This symbol is or Windows powershell . Select to execute as administrator.
- Select Yes at the User Account Control prompt.
- Enter the following command in the console and hit . To view a list Wi-Fi networks that have been saved to your computer, go into.
netsh Wlan Show Profiles - Keep track of the name and email address of the network profile that you wish to delete.
- Paste the following command and replace WIFIName by the name of your network. Then, press to enter.
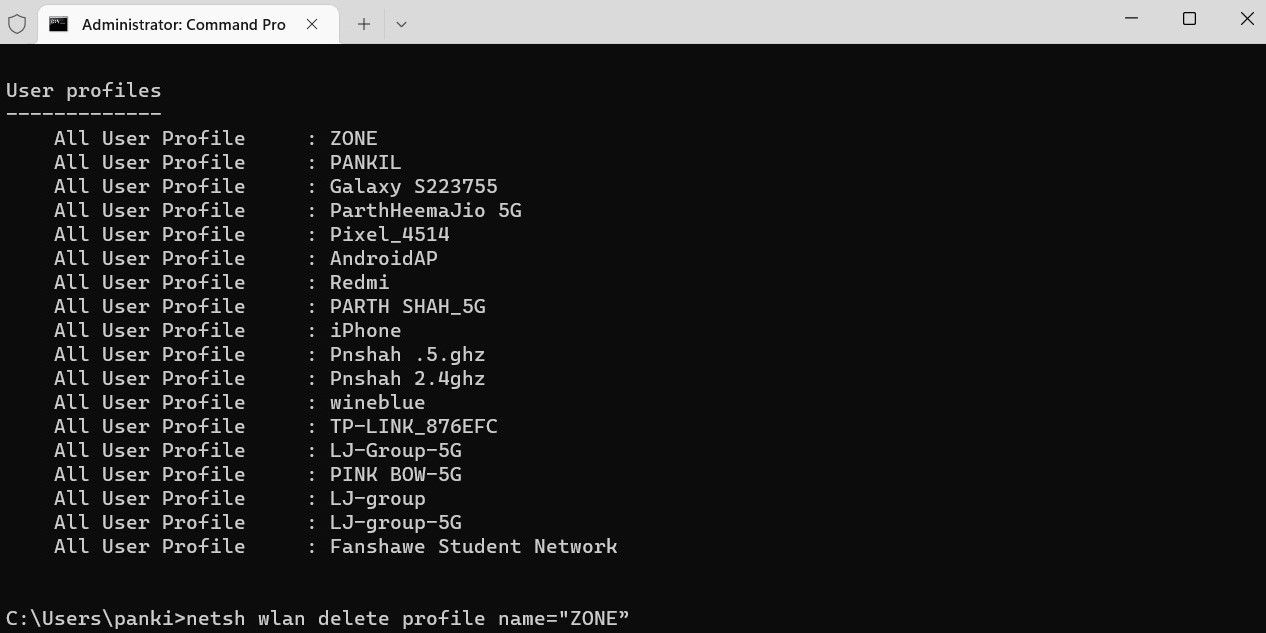
To remove multiple networks, you can simply repeat the command above. The command line tool allows you to delete all Wi-Fi networks that have been saved at once. This command will do the trick:
netsh wlan delete profile name=* i=*4. Use the Registry Editor to delete a Wi-Fi network you have saved
Registry Editor can be used to delete a Wi-Fi network that has been saved from Windows if you feel adventurous. You should only delete log files if they don’t work.
You should back up your log files if you use this method. For assistance, refer to our guide on backing-up and restoring Windows Registry.
Register Editor is required to remove Wi-Fi networks.
- To open the Run dialog box, press Win +
- Enter regedit, and then press to open. This will open Registry Editor.
- Select Yes at the User Account Control prompt.
- Navigate to Computer > HPEY_LOCAL_MACHINE> SOFTWARE> Microsoft > Windows NT > Current Version> Network List > Profiles.
- You will find many subkeys within profiles keys. Each key is a network profile.
- To identify the name and network, select a subkey.
- After you have found the key that corresponds to your network, right-click on it and choose .
- To confirm, select Yes
After you have completed the above steps, your saved profile will be deleted from your system.
How to connect to an unrecognized Wi-Fi network in Windows 11
After forgetting your password, you can always connect to Wi-Fi networks again later. You will need to manually select the network you want to authenticate and then enter your password.
To connect to Wi-Fi networks in Windows 11, use Win + a to access the Quick Settings panel. To see a list, click the arrow beside the Wi-Fi button. Click the Connect link to select the network that you wish to connect. You should now be able to connect to that network by entering the password.
This isn’t the only way to connect in Windows to Wi-Fi networks. For more information, see our guide on connecting to Wi-Fi in Windows.
Windows 11: How to delete saved Wi-Fi networks
There are no major disadvantages to keeping old Wi-Fi networks up on your computer. However, it is a good idea to delete some of them to make things more tidy. Windows 11 provides many options to delete unused Wi-Fi network connections.
You can manage Wi-Fi network profiles in Windows, in addition to removing them.